SPO Series
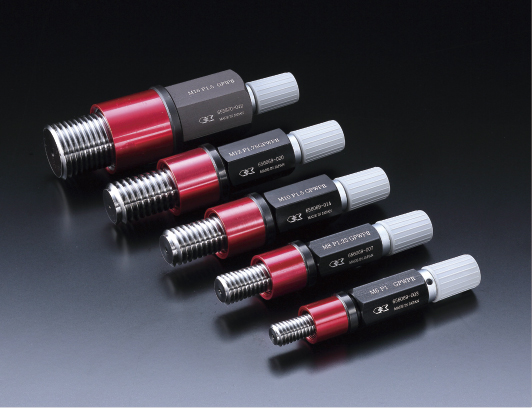
One-way Thread Gauge 2→1
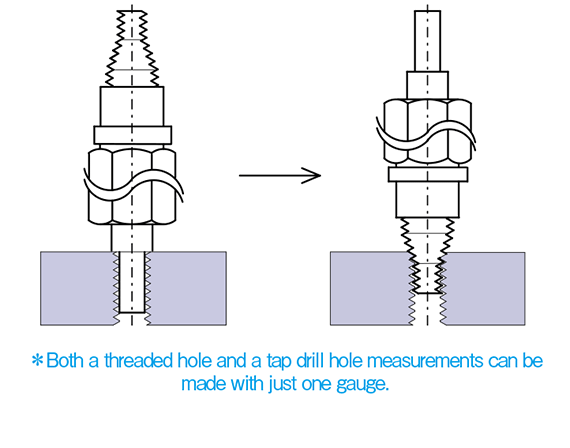
This gauge make operating efficiency improve from the double measurement to just once!
The one-way thread gauge make operational efficiency improve with just one measurement as opposed to an existing plug gauge must take a double measurement (Go / Not-Go).
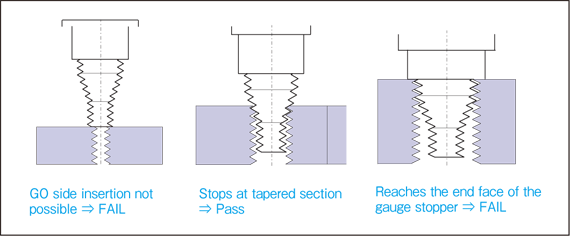
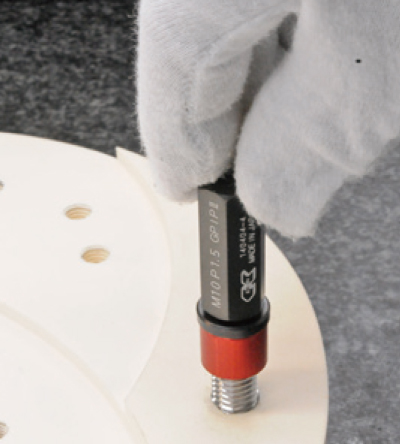
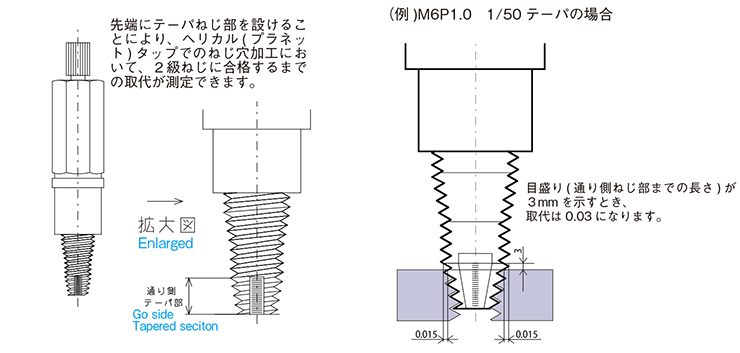
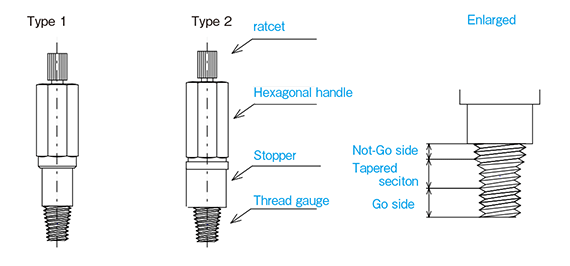
A passing grade is that the GO-side thread plug gauge section can be easily inserted in a tapped hole and it stops up to the end face of the gauge stopper.
Can privent an inspection error, because the go side gauge is guide.
Features
- A removable hexagonal aluminum handle is attached.
- The handle section uses a left-thread configuration to prevent over tightening.
- The gauge material is Gauge steel (SKS3, HRC58 or harder), and the gauge has exceptional wear resintance.
- An inspection report for the thread gauge is included with to provide confidence and assurance for users!
| Type of thread |
Pitch P |
Thread L1 |
Stopper L2 |
Stopper φD |
Full length L3 |
Hexagonal handle H |
Gauge type | Class | |
|---|---|---|---|---|---|---|---|---|---|
| M1.4 | 0.3 | coarse | 3 | 6.5 | 4 | 30 | 10 | GPIP (for JIS inspection) GPWP (for JIS work) GPNP (ISO) |
Ⅱ (JIS class) 6H (ISO class) ※M1.4[5H] |
| M1.6 | 0.35 | coarse | 3.5 | 6 | |||||
| M1.7 | 0.35 | coarse | |||||||
| M1.8 | 0.35 | coarse | |||||||
| M2 | 0.4 | coarse | 4 | 7 | 7 | ||||
| M2.3 | 0.4 | coarse | |||||||
| M2.5 | 0.45 | coarse | 4.5 | 6.5 | |||||
| M2.6 | 0.45 | coarse | |||||||
| M3 | 0.5 | coarse | 5 | 6 | |||||
| M4 | 0.7 | coarse | 7 | 9 | 8 | 40 | |||
| M5 | 0.8 | coarse | 8 | 8 | |||||
| M6 | 1.0 | coarse | 10 | 9 | 10 | ||||
| M7 | 1.0 | coarse | |||||||
| M8 | 1.25 | coarse | 12.5 | 10 | 12 | ||||
| M8 | 1.0 | fine | 10 | 12.5 | |||||
| M10 | 1.5 | coarse | 15 | 11 | 14 | 12 | |||
| M10 | 1.25 | fine | 12.5 | 13.5 | |||||
| M10 | 1.0 | fine | 10 | 16 | |||||
| M12 | 1.75 | coarse | 17.5 | 11.5 | 16 | ||||
| M12 | 1.5 | fine | 15 | 14 | |||||
| M12 | 1.25 | fine | 12.5 | 16.5 | |||||
| M14 | 2.0 | coarse | 20 | 12 | 18 | 17 | |||
| M14 | 1.5 | fine | 15 | 17 | |||||
| M16 | 2.0 | coarse | 20 | 12 | 20 | ||||
| M16 | 1.5 | fine | 15 | 17 | |||||
| M18 | 2.5 | coarse | 25 | 13 | 22 | ||||
| M18 | 1.5 | fine | 15 | 23 | |||||
| M20 | 2.5 | coarse | 25 | 13 | 24 | ||||
| M20 | 1.5 | fine | 15 | 23 | |||||
- ※Other specifications are available (effective diameter can be changed for fine, extra-fine, unified, and pre-plating sections).

| Type of thread |
Pitch P |
Gauge Length K (0.1mmStep) |
Thread L1 |
Stopper L2 |
Stopper φD |
Full length L3 |
Hexagonal handle H |
Gauge type | Class | |
|---|---|---|---|---|---|---|---|---|---|---|
| M1.4 | 0.3 | coarse | 1.2 ~5.0 | K+3P | 6.5 | 4 | 30 | 10 | GPIP (for JIS inspection) GPWP (for JIS work) GPNP (ISO) |
Ⅱ (JIS class) 6H (ISO class) ※M1.4[5H] |
| M1.6 | 0.35 | coarse | 1.4 ~5.0 | 6 | ||||||
| M1.7 | 0.35 | coarse | 1.4 ~5.0 | |||||||
| M1.8 | 0.35 | coarse | 1.4 ~5.0 | |||||||
| M2 | 0.4 | coarse | 1.6 ~7.0 | 7 | 7 | |||||
| M2.3 | 0.4 | coarse | 1.6 ~7.0 | |||||||
| M2.5 | 0.45 | coarse | 1.8 ~9.0 | 6.5 | ||||||
| M2.6 | 0.45 | coarse | 1.8 ~9.0 | |||||||
| M3 | 0.5 | coarse | 2.0 ~9.0 | 6 | ||||||
| M4 | 0.7 | coarse | 2.8 ~12.5 | 9 | 8 | 40 | ||||
| M5 | 0.8 | coarse | 3.2 ~12.5 | 8 | ||||||
| M6 | 1.0 | coarse | 4.0 ~17.5 | 9 | 10 | |||||
| M7 | 1.0 | coarse | 4.0 ~17.5 | |||||||
| M8 | 1.25 | coarse | 5.0 ~20.0 | 10 | 12 | |||||
| M8 | 1.0 | fine | 4.0 ~20.0 | 12.5 | ||||||
| M10 | 1.5 | coarse | 6.0 ~25.0 | 11 | 14 | 12 | ||||
| M10 | 1.25 | fine | 5.0 ~25.0 | 13.5 | ||||||
| M10 | 1.0 | fine | 4.0 ~25.0 | 16 | ||||||
| M12 | 1.75 | coarse | 7.0 ~30.0 | 11.5 | 16 | |||||
| M12 | 1.5 | fine | 6.0 ~30.0 | 14 | ||||||
| M12 | 1.25 | fine | 5.0 ~30.0 | 16.5 | ||||||
| M14 | 2.0 | coarse | 8.0 ~32.0 | 12 | 18 | 17 | ||||
| M14 | 1.5 | fine | 6.0 ~32.0 | 17 | ||||||
| M16 | 2.0 | coarse | 8.0 ~32.0 | 12 | 20 | |||||
| M16 | 1.5 | fine | 6.0 ~32.0 | 17 | ||||||
| M18 | 2.5 | coarse | 10.0 ~36.0 | 13 | 22 | |||||
| M18 | 1.5 | fine | 6.0 ~36.0 | 23 | ||||||
| M20 | 2.5 | coarse | 10.0 ~40.0 | 13 | 24 | |||||
| M20 | 1.5 | fine | 6.0 ~40.0 | 23 | ||||||
- ※Other specifications are available (effective diameter can be changed for fine, extra-fine, unified, and pre-plating sections).
Not-go side section is only 2 pitch, but removing the stopper make calibration as standard thread gauges.
Removing the stopper does not need an exculsive tool.
1.Remove the stopper.
2.Measure the go side.
3.Measure the Not-go side
4.Set the stopper


